What is Macromedia
Macromedia Flash is a graphics and animation program whose existence is for lovers of creative design and animation to create interactive web animation , cartoon animation movies , business presentations or activities , company / organization profile and an interesting flash game . Therefore , it is the Macromedia Flash program is provided various facilities as well as other supporting capability that serves as a means to be creative in order to give birth to ideas that are stored in our minds . By doing so , it opened the way to channel the bright ideas that we have to realize the work - our work .
Macromedia Flash is a graphics and animation program whose existence is for lovers of creative design and animation to create interactive web animation , cartoon animation movies , business presentations or activities , company / organization profile and an interesting flash game . Therefore , it is the Macromedia Flash program is provided various facilities as well as other supporting capability that serves as a means to be creative in order to give birth to ideas that are stored in our minds . By doing so , it opened the way to channel the bright ideas that we have to realize the work - our work .
How to use Macromedia
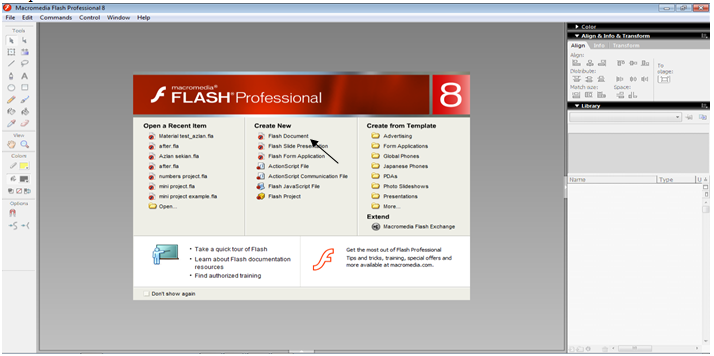
1. Open
new flash document Macromedia Flash is a graphics and animation program whose existence is for lovers of creative design and animation to create interactive web animation , cartoon animation movies , business presentations or activities , company / organization profile and an interesting flash game . Therefore , it is the Macromedia Flash program is provided various facilities as well as other supporting capability that serves as a means to be creative in order to give birth to ideas that are stored in our minds . By doing so , it opened the way to channel the bright ideas that we have to realize the work - our work .
Macromedia Flash is a graphics and animation program whose existence is for lovers of creative design and animation to create interactive web animation , cartoon animation movies , business presentations or activities , company / organization profile and an interesting flash game . Therefore , it is the Macromedia Flash program is provided various facilities as well as other supporting capability that serves as a means to be creative in order to give birth to ideas that are stored in our minds . By doing so , it opened the way to channel the bright ideas that we have to realize the work - our work .
How to use Macromedia
2.Setting frame

3. Make scene and give the name
of scene. Window, Other Panels, Scene (press shift+F2) and double click that
scene. Give name of your scene.

4. The scene (loading) on layer 1
makes loading animation. Click Rectangle Tool (press R) draw it, Selection Tool
(press V) click on the rectangle, right-click and choose create motion tween),
Free Transform Tool (press Q), move the rotation and pull the rectangle on your
left and choose 80 on the frame then right-click (insert keyframe) pull the
rectangle.

5. You can design your box
(menu/start, kembali/back, lanjut/next, selesai/exit, etc.) using PowerPoint.
6. The scene (menu) you can make
some layer (don’t forget to rename it).
7. Add background on your scene.
(color or picture) if you want give color of your background you can choose
from colors tool. Or picture from file, import to library and drag from library
to your sheet.
8. Copy paste one by one from layer go to box on
your PowerPoint (don’t forget to give same name of library, layer and scene

9. Give action of “menu” layer.
Right-click, action, add a new item to the script, global functions, timeline
control, stop (press Esc+st). Make your box as your button. Right-click on the
box, convert to symbol, give name your button like your box (ex: tbl_menu and
so on).

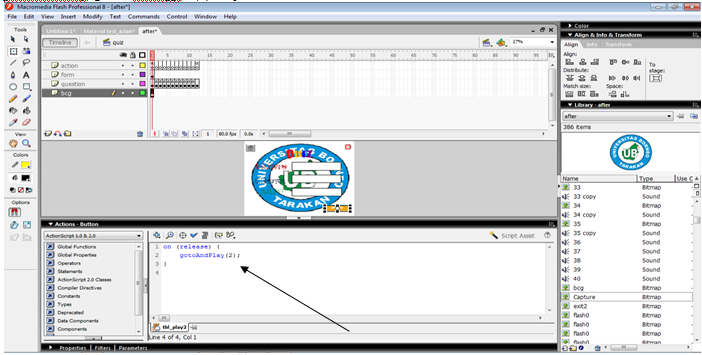
10. Give action in every button. Make sure every
your button must turn “ON”. Right-click on the button/box, action, add a new
item to the script, global functions, movie clip control, on (press Esc+on),
release. Move your cursor of braces “{“, timeline control, gotoAndStop (press
Esc+gs). In bracket typing “menu”, 1 (don’t forget to check your syntax).

11. The scene (quiz) you can make identity of
students and the result of their quiz. Let’s make identity of students, design
the background and some box in this scene (you can make some layer). Change
Text Type with Input Text in order that the students can typing their name,
class and gender.

12.Choose “Show Border Around
Text” to make the students know the box to typing their identity. Copy it until
their gender “M/L” (don’t forget to embed the box “all” or “numeral”).

14. Give effect of your “Play” button and also “Option” button
in your question. Double click, Insert KeyFrame “up, over and down”. (Up and
Down have different color with over).

15.
Make some question in your quiz. You can Insert Blank KeyFrame in the second
and so on frames of “question” layer. In the beginning of “action” layer you
can make action, add a new item to the script, global functions, timeline
control stop (Esc+st) auto format then typing score=0; and the last frames of
“action” layer, add a new item to the script, global functions, timeline
control stop (Esc+st) auto format percentage=(score/10)*100+””;
16. In the same layer
with identity of students (the first frame) and “The Result” the last frame
(you can copy paste in place for identity students (make sure you make variable
in every box) in order that the students only typing their identity in the
first frame and will be automatic their identity already in the box of “The
Result”.

17.
In the “question” layer make some question and option to answer. Make sure all
options as button, give action, add a new item to the script, global functions,
movie clip control, on (press Esc+on), release. Move your cursor of braces “{“,
timeline control, gotoAndPlay (press Esc+gp) (3); enter and typing score++; of
the correct button (no need to typing score++; if the option false answer). For
the next question/frame at the same layer

18.Make
“Exit” button give 2 options Yes and No (Don’t forget the instruction and make
convert to symbol “button”). For “Yes” option, add a new item to the script,
global functions, movie clip control, on (press Esc+on), release. Move your
cursor of braces “{“, fscommand (press Esc+fs) (“quit”) “No” option, add a new
item to the script, global functions, movie clip control, on (press Esc+on),
release. Move your cursor of braces “{“, timeline control, gotoAndStop (press
Esc+gs). In bracket typing “menu”, 1 (don’t forget to check your syntax).
